Wednesday, June 18, 2014

Plastic-Fantastic Melissa Shoes!

So, I know I said I was done and dusted with my shoe addiction, after a period of time of buying one too many pairs of Wittner shoes, but…. I knew there really was no turning back after I first set foot into the M Dreams store in Melbourne last year. Everyone, meet my latest shoe brand obsession, Melissa.

Melissa may have only appeared in the Australian fashion market in the last decade or so, but this Brazilian brand has been around since 1979. It is unique in that all its shoes are jelly shoes - yes, made with a particular type of plastic, called melflex, which is supposed to be the most durable, flexible, comfortable, and 'breathable' (well, as breathable as plastic can be) type of PVC available, which is also hypoallergenic and odourless. Besides being obviously vegan-friendly, they are also environmentally friendly, as the plastic material is easily disassembled to be recycled. According to the company's website, they support environmentally-friendly and sustainable factory practices and therefore recycle over 99% of the factory's water and waste and recycle overstocks into their new season production lines. In fact, you may already be somewhat familiar with the name of the manufacturer of these shoes, Grendene. The only thongs (just to be clear, in Australia, thongs mean flip-flops, not G-strings!) I own and would ever willingly wear out are the Gisele Bündchen x iPANEMA ones, which are - surprise! - made by Grendene, and, again, of melflex. So, I guess there really is no surprise that I find Melissa shoes to be comfortable to wear; though, admittedly, I didn't realise these shoes were made by the same manufacturer until after I had bought my first pair. 

Don't let the fact that the shoes are made of plastic put you off. The heels are sturdy and the styles are unique and highly en vogue, as the brand collaborates with designers across different fields, including big names like Karl Lagerfeld, Vivienne Westwood and Jean Paul Gaultier. The prices of these shoes range from A$59.95 to $385 (RRPs of the shoes currently available). 

But enough from me; I'll let the pictures do the talking now. Here's my first ever pair of Melissa heels:

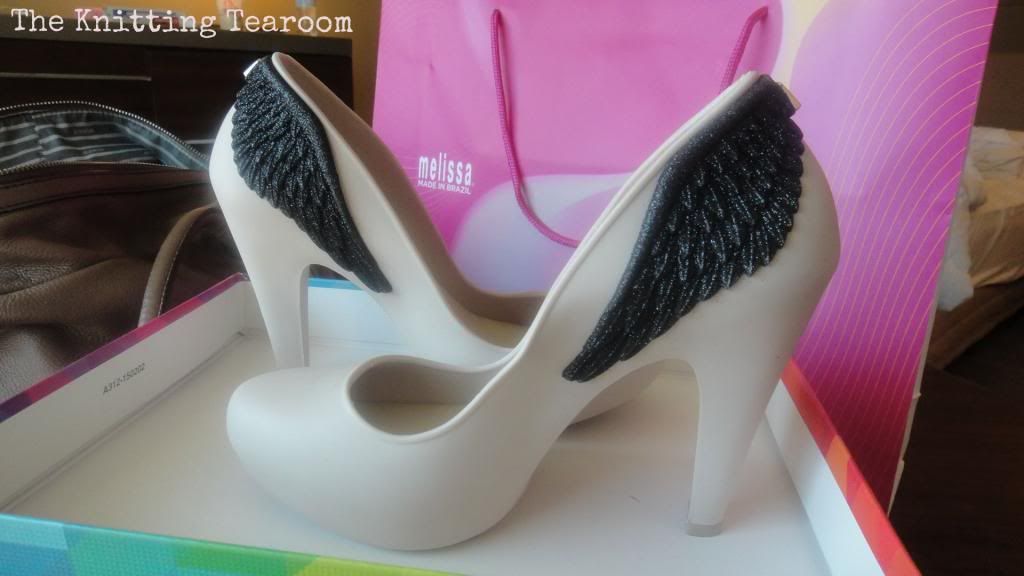
Melissa Incense Wing
Gorgeous, right? How could I possibly resist making the purchase? The 3D detail on the wings is just stunning, and the glitter adds a nice touch of sparkle to the matte-finish shoe. 


From this year's 'We are Flowers' collection:

Melissa Incense Garden


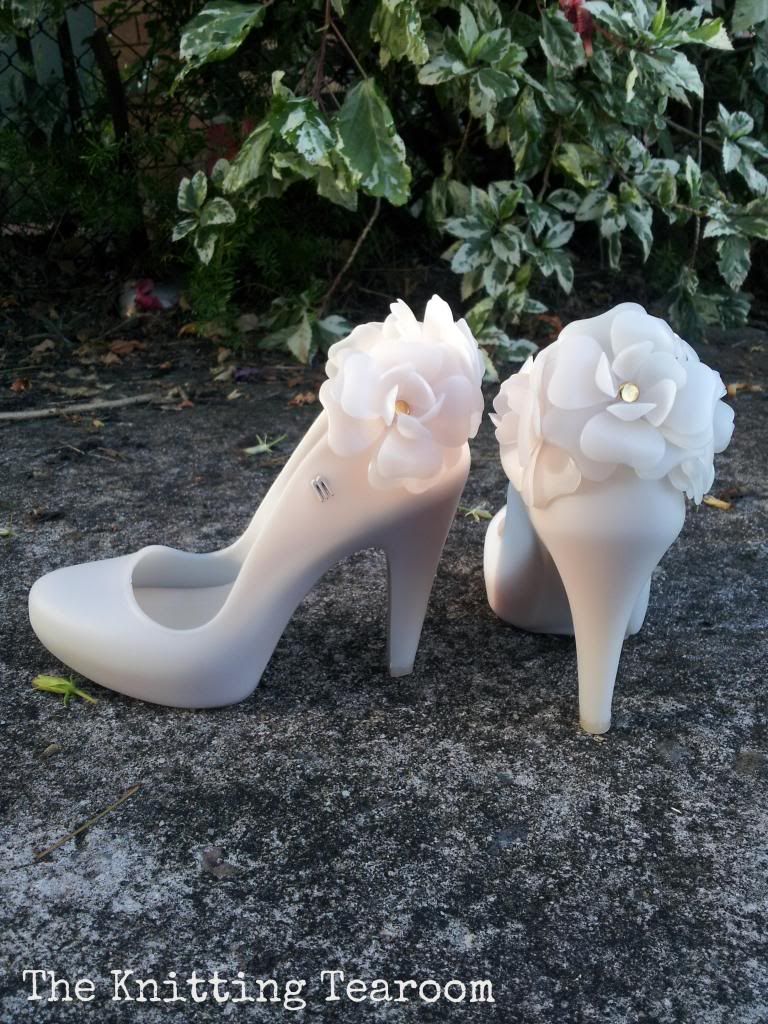
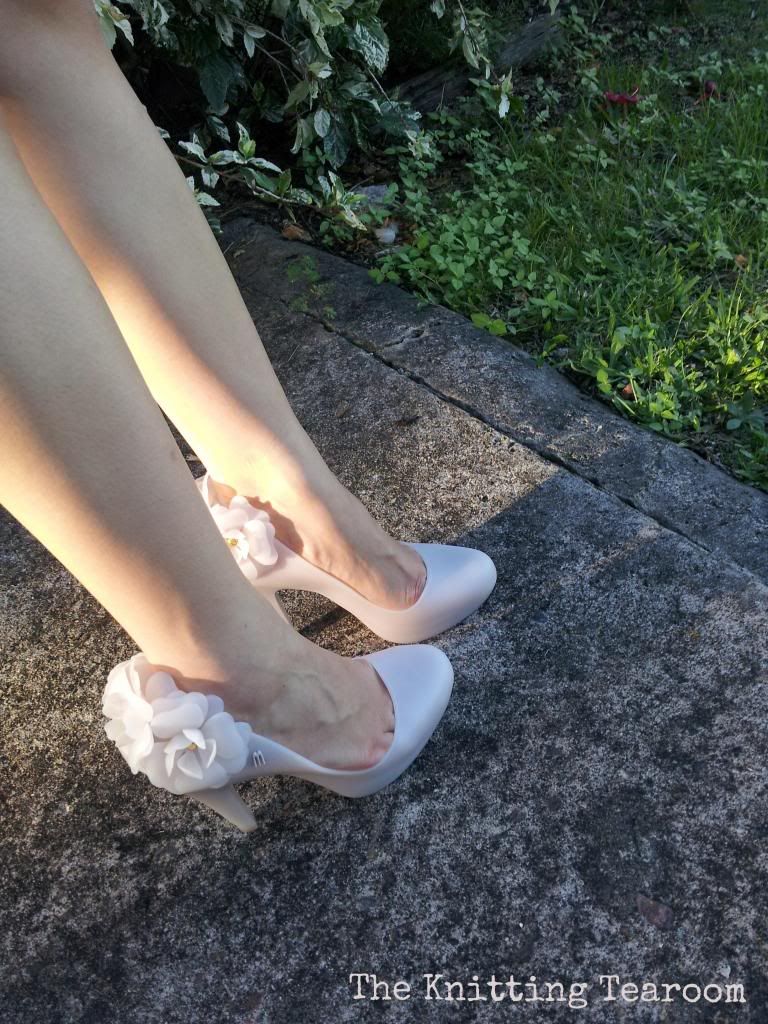
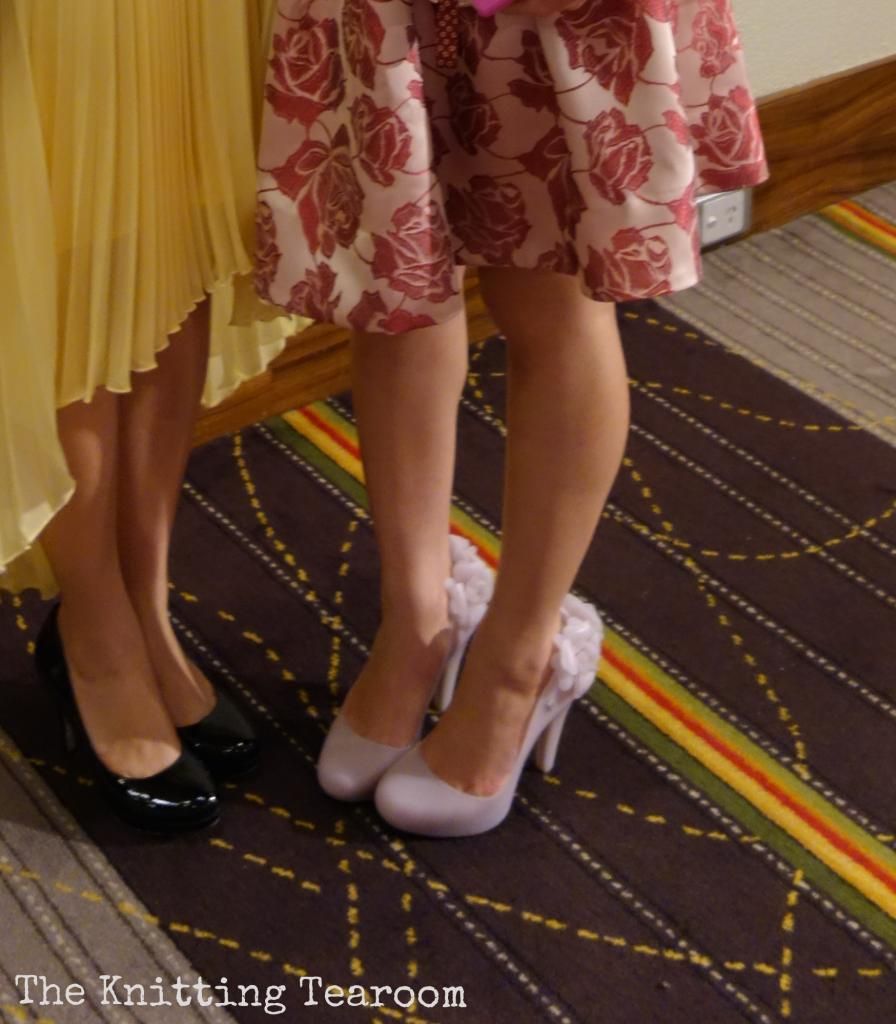
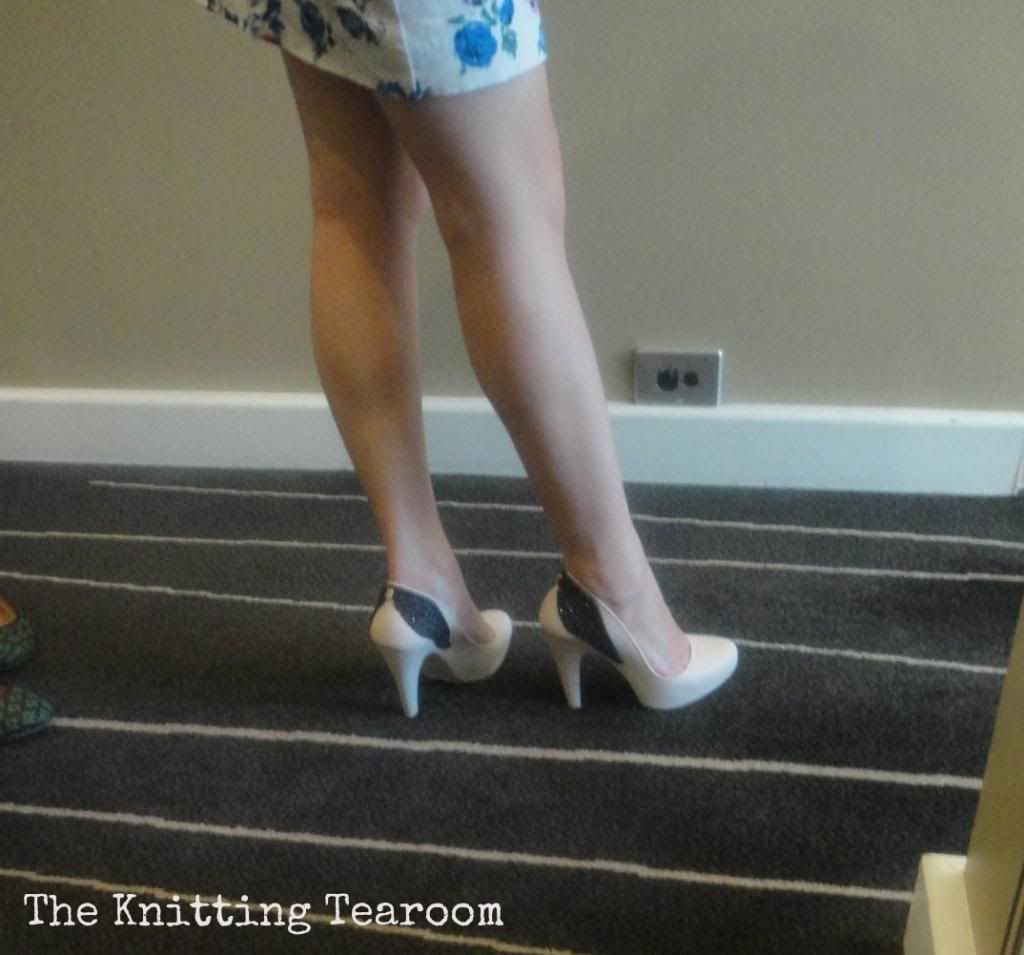
The 3D flowers clustered at the back of the heel are très chic and adorable! They were being advertised as a choice of bridal shoes, when they were first released, and I think they would indeed fit the bill perfectly. I love the soft touch of these shoes and the slightly translucent, 'frosted' quality of the plastic. The fit is quite snug, even though I had bought the same size (6) as for my first pair of Melissa heels. However, when I wore them to a ball last weekend (where the last photo was taken), they didn't hurt my feet at all, possibly because the construction doesn't involve any seams. Usually, by the end of the night, I would almost be at the point of developing blisters, if I was wearing a pair of my leather heels. Having said that, I was mainly sitting at the table the whole night and I didn't hit the dance floor, so it remains to be seen how long these shoes can comfortably be worn for with normal wear. On a side note, how sweet do these shoes look with my Alannah Hill 'The Bad Seed' frock? 
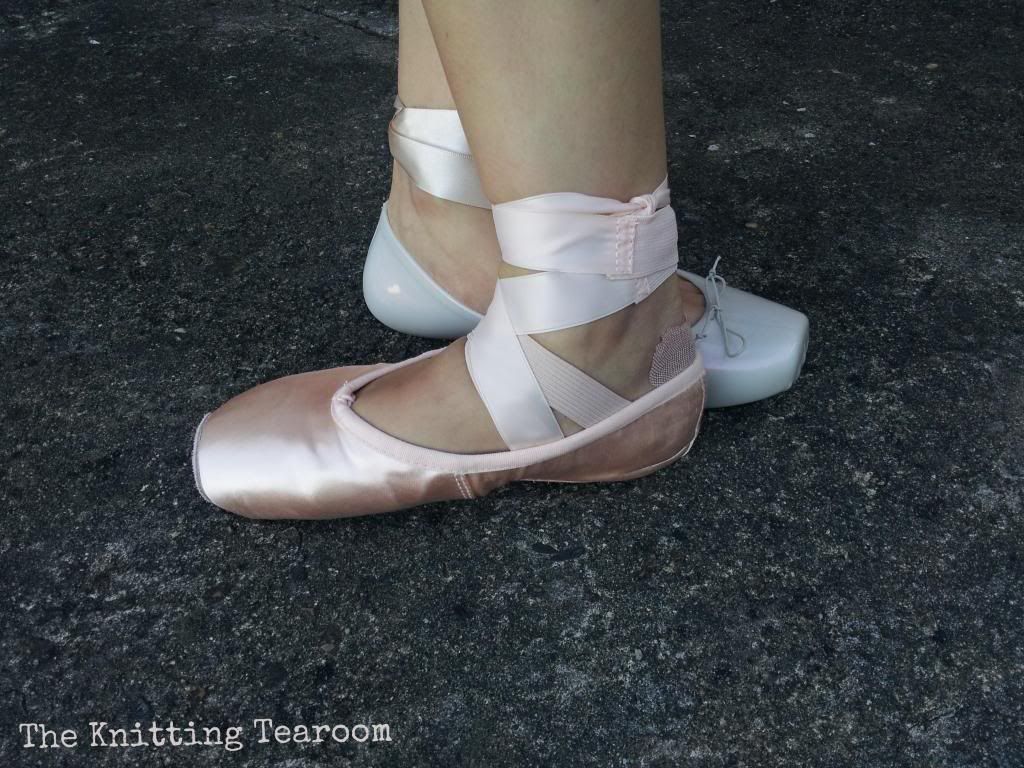
Melissa Ballet II:


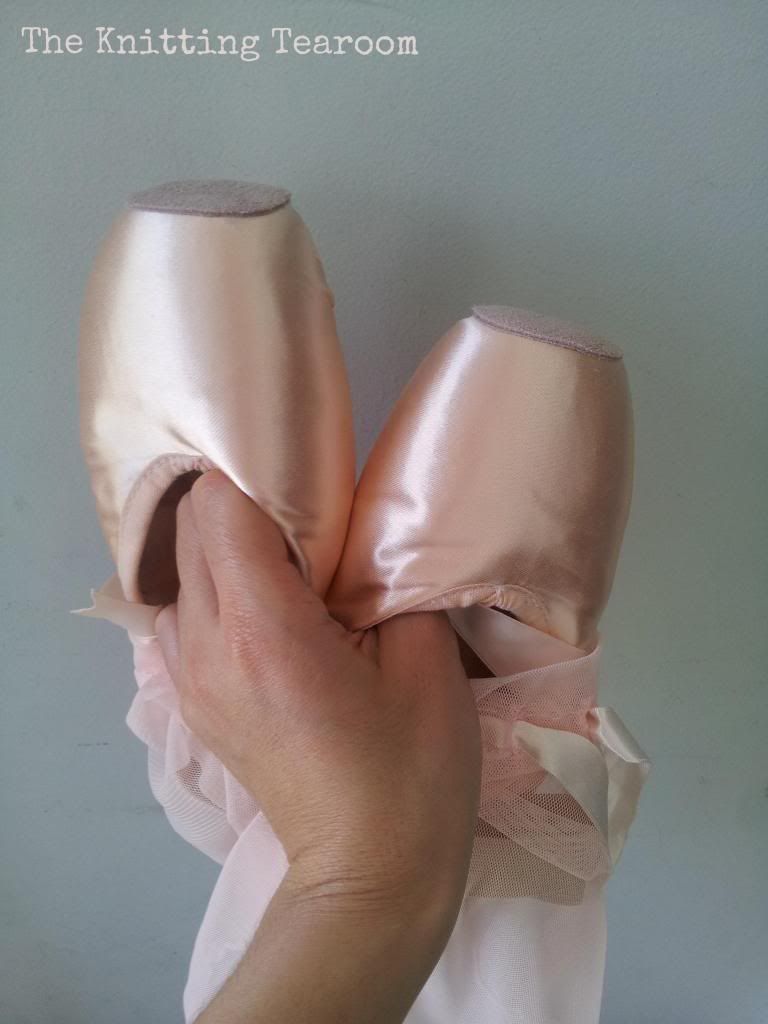
Ha, just kidding! They're good at mimicking the design of the ballet pointe shoe, but not that good. I just thought I'd show their interpretation alongside my own, real, pointe shoes, so that you can see what a good job they did. Here they are:


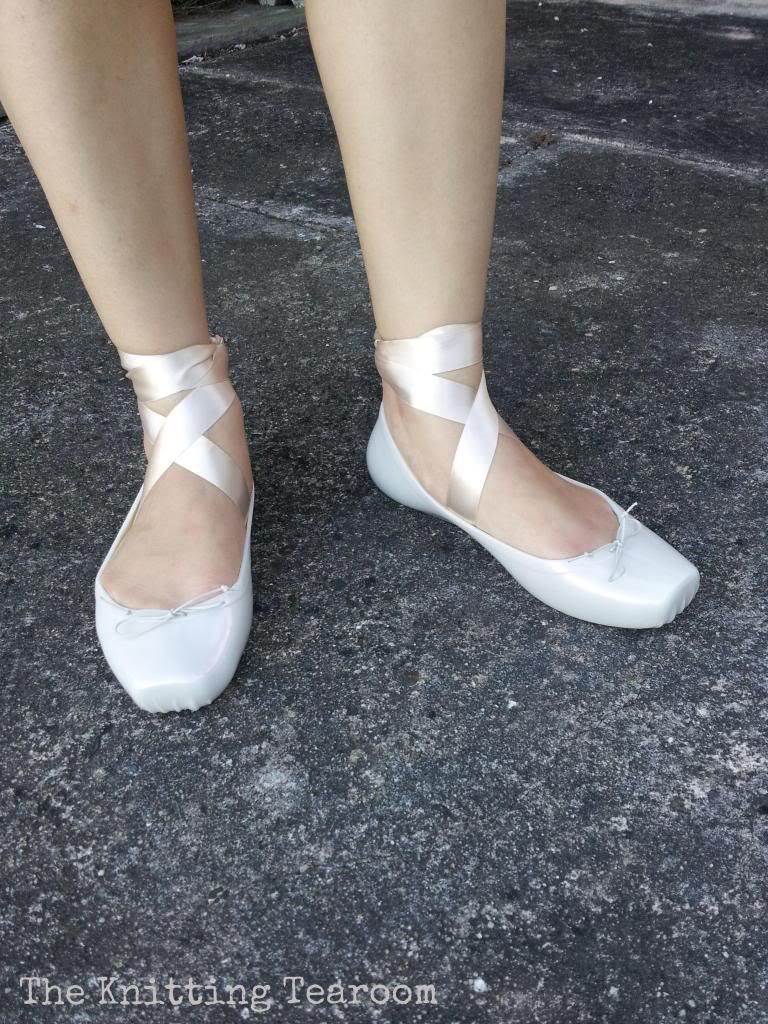
I've seen some people tie the ribbon roughly, leaving the large bow/knot exposed at the side or back of the ankle. Maybe it's because I do ballet, but I just can't stand the sight of ballet ribbons being tied incorrectly and untidily, even if these are just fashion shoes. 


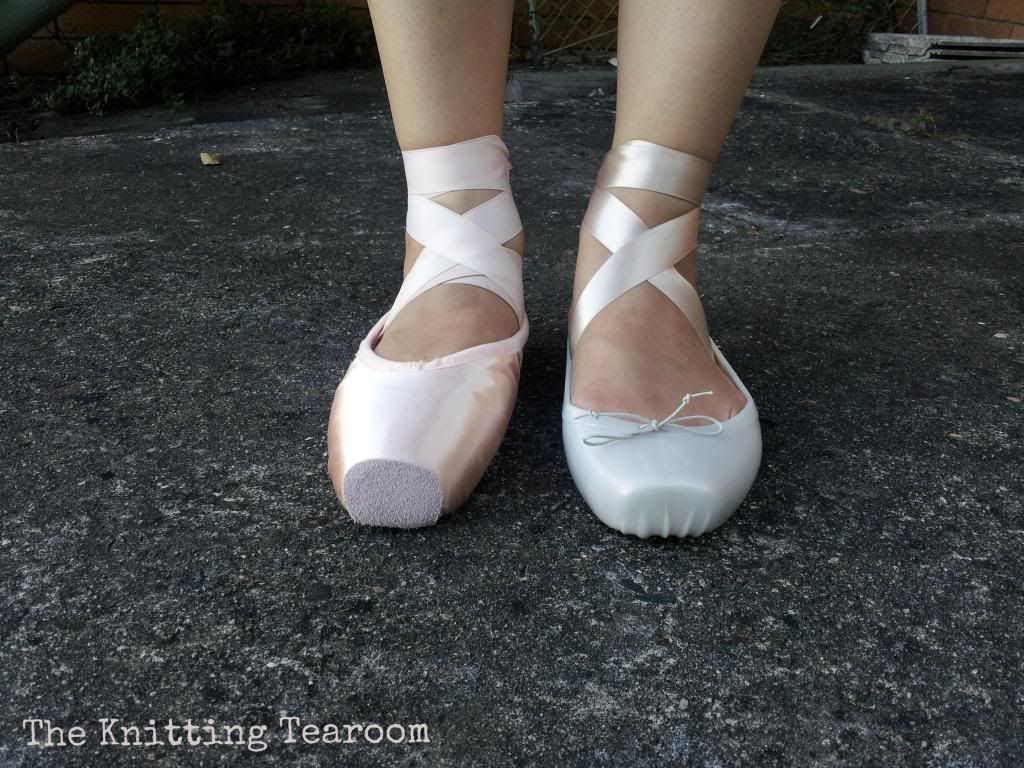
I am so impressed with the details, from the 'elastic' bow at the vamp and the raised border around the opening, to the 'gathering of the fabric' under the point of the shoe. You can't see it on the pointe shoe, because I've attached a suede tip to increase the longevity of the satin fabric at the toe. 


Here's the Campana Papel flats that I bought from the M Dreams store on a recently visit to Sydney:


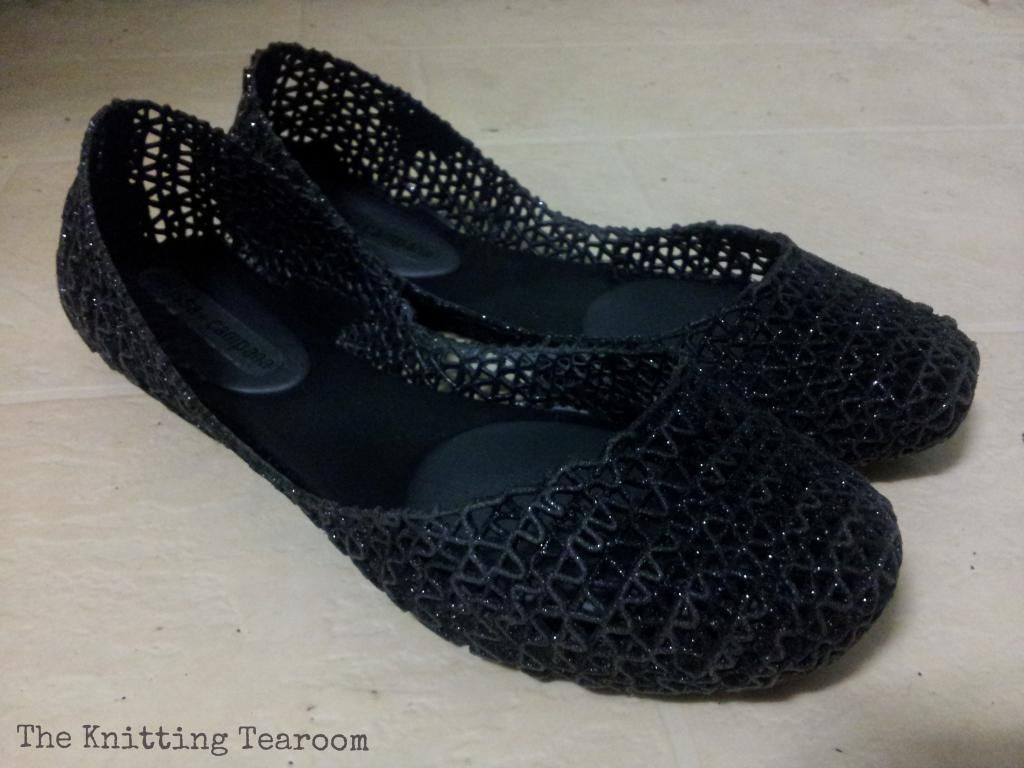
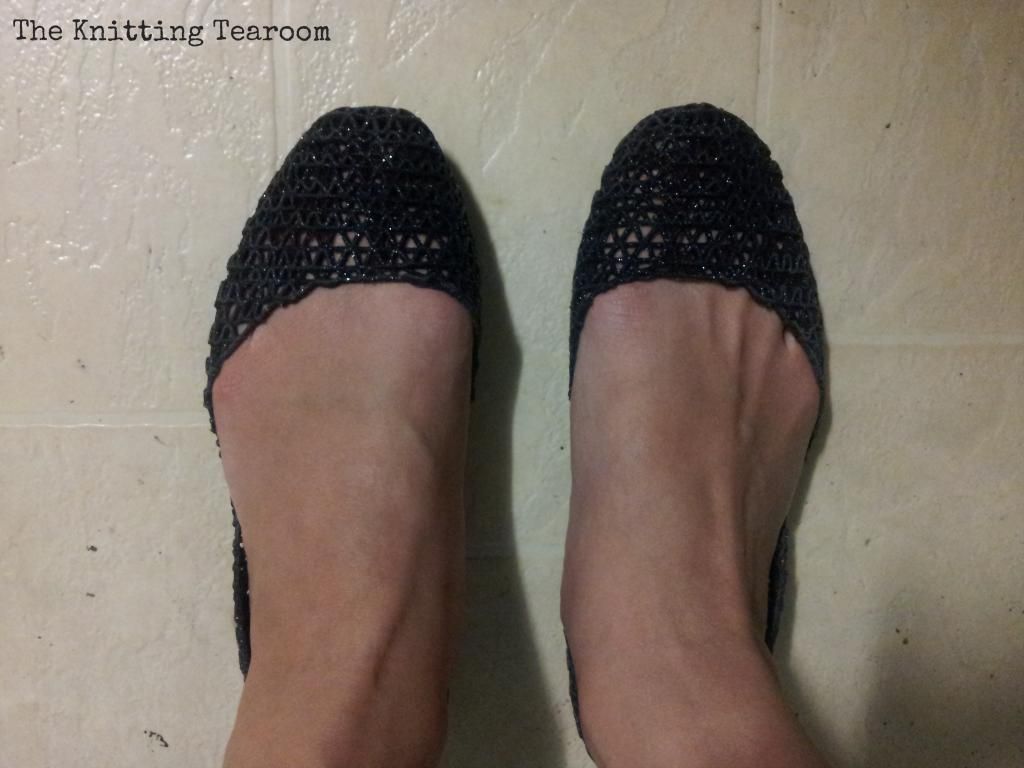
While I can take small doses of it, glitter is not really my thing. The black looks the most understated of all the available colours, so I ended up buying it for work. I took this photo after a couple of wears, so you can see that it does lose quite a bit of its glitter with time. I love the awesome designs that the Campana Brothers come up with, and even though it's relatively simple and in black, people at work still notice them. They are quite comfy to wear, but not so suitable for running around in, because I find they tend to slip off at the heel with brisk walking. But definitely a pair of shoes I don't regret buying. 

I should mention also that a distinct feature of all Melissa shoes is the sweet bubblegum scent that is infused into the plastic material. Yum! 

With the ability to meet fashion trends, while maintaining quality, durability and comfort, could plastic be our answer to sustainable fashion in the future?


Wednesday, June 11, 2014

My lazy day breakfast

Days off are for sleeping in and lazily pottering around the kitchen, still in 'jamies, throwing together whatever can be found to make a late breakfast. 


Simple and wholesome: Spread roughly smashed avocado onto lightly toasted bread (preferably wholegrain); add a squeeze of lemon juice to add a fresh zing and to keep the avo from oxidising (developing an unappetising brown shade); and finish with a little pinch of Maldon salt flakes and a fresh grinding of Tasmanian Mountain Pepperberries. Serve with a couple of eggs, cooked your preferred way, a slice of cheddar cheese (not shown in picture) and a glass of freshly-squeezed juice. If you have it, why not treat yourself to a bit of tangy zucchini relish, too? And there you have it - a simple, healthy breakfast to provide you with your day's first doses of fibre, protein, good fats, and vitamins E and C. Substitute your butter/margarine with a thin smear of good ol' Vegemite, for a hit of Vitamin Bs as well.


Bonne journée, mes amis :) x


Monday, May 12, 2014

'Pass it on': Let's make some holes!

If you have been reading my blog, you would know that I've been a bit obsessed with lace knitting lately. Naturally, when I was having a good think about what knitting technique I should pass on, I cast my mind back to the time when I first started lace knitting and what challenges I had encountered. One of these was with a basic technique that you would need for all lace patterns - the yarn over (abbreviated as 'yo'). 


My growing collection of lace knitting resources

There are a fair few knitting websites, blogs and YouTube videos out there on the www that explain particular ways of doing the various types of yarn-overs, for which I was quite grateful. However, I remember almost ripping my hair out with frustration, because I couldn't for the life of me understand why some yarn-overs created holes significantly larger than others. You see, the tricky thing with yarn-overs is that, easy as the actual manoeuvres may be, the way you go about making them will determine the amount of yarn that is used between the stitches on either side them, and hence the size of the resulting holes. There's no way that is more 'right' than another, since blocking the finished work is going to even the holes out a bit; however, if you are a bit of a perfectionist like me, seeing vastly different sized holes form in one piece of knitting is positively going to drive you up the wall. 

Ultimately, through a lot of Googling and trial-and-error, I came up with my preferred method of carrying out this technique, which I have found to yield the least inconsistencies in hole sizes between the different types of yos. I think it's only fair to reciprocate the favour of the tech-savvy, advice-dispensing knitters out there by sharing this and passing it on to those new to lace knitting. Shall we go through it now, step-by-step?

How to yarn-over between 2 knit stitches:

After the first K stitch, carry the yarn under the needle from the back of the work to the front. Leave it there and knit the next stitch. 


How to yarn-over between a knit and a purl stitch:

After knitting the first stitch, bring the yarn under the needle to the front, then wrap it around the needle once, finishing at the front of the work again, in preparation for purling. Purl the next stitch. 


How to yarn-over between a purl and a knit stitch:

After purling the first stitch, leave the yarn at the front and knit the following stitch. 


How to yarn-over between 2 purl stitches:

After purling the first stitch, take the yarn under the tip of the needle to the back of the work, then purl the next stitch.


Out of all the yarn-overs, this one actually feels a bit weird and even looks like it might be wrong when you do it, especially when you knit across the stitches on the following row. Just breathe, and rest assured that all is well. 

Knit and compare:

Here's a swatch with all the yarn-overs knitted using the methods described above, in the same order (bottom to top). I'm sure you'll agree that they all look roughly around the same size. I prefer my yos to be small and neat, but you may find that other methods may achieve a look that you might like better. My advice is to try out all the different ways of doing it, and finding out through personal experience which you are most comfortable with. 


Well, that's it for this tutorial! Hopefully it will save some hairs on the heads of newbie lace knitters out there, or at least provide inspiration for others to try out new ways of approaching certain knitting techniques. 

Knit on! x


Disclaimer: This blog entry is my submission to the Deramores Blog Awards 2014. Deramores is the UK's number one online retailer of knitting and crochet supplies. 

Friday, May 2, 2014

Ltd Espresso + Brew Bar - THE best coffee in Brisbane


Ltd Espress + Brew Bar
362 Brunswick St, Fortitude Valley QLD 4006
http://ltdespresso.com
(Open every day of the week!)

My friend once said to me, during one of my raving reviews about a certain coffee spot, that it isn't actually hard to find a good coffee in Brisbane. I would tend to agree (but, of course, do stay away from coffee at fast food chains!), however, there is a difference between a tolerable cup of coffee, a better-than-average cup that you would prefer to have regularly, and certainly a great cup of coffee that you might go out of your way to get hold of. And it isn't always easy to find the latter, unless you're actively scouting out all the existing coffee shops to try. 

For me, the best coffee in Brisbane (thus far) is found at Ltd Espresso + Brew Bar (which said friend, a coffee-lover, hadn't even heard of). If this place wasn't recommended to me by a colleague, who is a regular customer there, I don't know if I would have ever found out about it. I just did a quick search for 'Coffee in Brisbane' on Urbanspoon, and choosing the list by popularity, this particular place is lost amidst the 1316 other results, on page 2. However, if you go on beanhunter.com, which I didn't know about before and is specific for coffee, Ltd is actually listed as #1 in Brisbane. So, there you go. Trust the coffee addicts. 

If I wasn't looking out for this place, I think I would've totally overlooked it driving past, because the shop front is tiny; not much wider than the actual door itself. The contemporary-looking interior is quite narrow and is designed like a bar, where you can sit along the bench opposite the barista at his work. There are a few stools along the wall there where you can sit and have your coffee (there's little square platforms protruding from the wall to seat your beverage), but it can get pretty squishy when people are trying to walk through to the little partially enclosed sitting area right at the back, where there's cushions to allow you sit more comfortably, a little coffee table, and a selection of books for you to flip through, while you enjoy your coffee. 

The main barista there, Luke, who is also the owner, is a true coffee expert. He is very friendly and always keen to chat about all things coffee-related. When a shop is operated by someone who oozes enthusiasm and passion for what they do, you can almost be sure that their goods are not likely to disappoint. 

My cappuccino
The coffee they use is by Cleanskin Coffee Co., which is a roastery in Brendale, north of Brisbane. Not only does it taste good, but the beans are also sourced from ethical and sustainable farms around the world; so, extra brownie points for that. The coffee I get from here is always perfectly brewed and has a wonderful flavour. I generally find that it is smooth, strong and deep, without ever verging on bitterness. I usually opt for milky coffees, but Ltd also offers specialty blends and makes cold drips and other fancy things, which I have yet to try (but have heard/read good reviews about). 

A cold press coffee is also offered, but this is not made on site. The last time I spoke to the owner about this, he said the coffee concentrate (or whatever it is called), made from some secret recipe, is produced by another company and sent to them, and they dilute it with the right proportion of milk and bottle it up. Now, I'm not sure if things have changed since then, because the packaging is different (see pictures below), and I'm sure the cold press tastes sweeter than it used to. Nonetheless, it's still a nice-tasting iced coffee, perfect for warm weather days, when it's just too hot to drink normal coffee. These are stored in their fridge and available for takeaway. I think they're sold for about $4.50-5 per bottle, but occasionally they have specials, like $20 for a 6-pack, so keep an eye out on their Facebook page!

Cold press coffee


One thing to note about Ltd is that they almost exclusively trade in coffee. They sell a small selection of baked goods, made and delivered to the shop by someone else, so you can still have something to nibble on with your coffee, but don't expect a range of your typical café offerings being available.

Interestingly, this shop is located next to Reverends Fine Coffee, which is also listed as one of the top 10 coffee spots in Brisbane, on Bean Hunter. I shall review their coffee for you when I try it out next time :) In the meantime, I hope I helped you find another favourite coffee spot!


LTD espresso + brew bar on Urbanspoon

Tuesday, April 29, 2014

The Suzanne Stole


Now that the recipient of this gift has received it, I can finally reveal the project I was working on several weeks ago: The Suzanne Stole (I named it after my sister, the recipient). 

Remember how a while back I was talking about designing my own shawl with a simultaneous lace edging, also for my sister? Well, this is not it :P The yarn I was using for that other project was shedding like crazy, and because it was a deep crimson colour, the little fibres would be so obvious on whatever I was wearing, and whatever the work surface was, at the time of knitting. I'm not really sure what makes yarn shed like that; it's not like I was using extreme force on it, or knit with very tight tension. It was a 100% alpaca yarn, too, by Artesano. Anyone who knows why, please demystify me. But anyway, that's why I sort of left that project aside….

The Suzanne Stole is also my own design. I entertained the idea of knitting a lace border all around the leafy centre, but I decided I quite liked the organic look of the leaves along one edge. The simple, pointed lace edging in this case was knitted on after the central part was complete. I think knitted-on edgings are not only great for indecisive knitters like me, who might like to start a project while still mulling over what kind of edge pattern to use, but it's also practical in that you have absolute control over exactly how many full repeats each of the main body and edging patterns that you want. 

The yarn I used for the stole is a 100% baby alpaca yarn, named 'Inca Alpaca', by Classic Elite Yarns ( can you tell I like 100% alpaca yarn?). It has a smooth hand, and knits up to a nice, soft and squishy fabric. It looks like the heavy-worsted yarn would not be suitable for knitting lace, when you look at the completed, pre-blocked form of my stole, below left. (In fact, all lace work at this stage generally looks less than impressive; so we, as knitters, just have to have faith that it will all work out in the end!) Of course, after working some magic, that is blocking, the knitted fabric stretched out, as anticipated, to a larger size and relaxed to open up the lace work. Perhaps also due to the stretching and having less weight per unit area, the stole became a lot lighter, but retained its warm and cosy properties. Check out the before and after photos below!

(Left) Pre-blocked piece; (right) Blocked and ready to wear


Looking at it now, the stole would have probably benefited from having a straight-edged lace border on the exposed side, or having an extra repeat of the central lace panel, width-wise, to make it slightly wider and compensate for any curling of the leafy edge that may occur with wear. I did suggest to my sister, though, that if curling does occur, she could always wear it as a neck-scarf, until it's time to wash and re-block again :)

I knitted the stole so that it would be long enough to wear in my 2 favourite ways - loosely wrapped around the shoulders, or simply draped over them, to show the lace pattern to its best advantage. It's so warm and snuggly, I didn't want to part with it! 


I was so excited to hear that my sister really likes it, and it gives me a buzz whenever I see pictures of her wearing it :)

Well, onwards and upwards! I hereby declare that my next shawl design shall be one with a simultaneously-knitted lace edging. Yep. Not giving up on that one lightly, after just one yarn mishap.

More updates coming soon on what's currently on my needles :)


Knit on x


Sunday, April 13, 2014

It's beanie-knitting time again!

I finished my latest knitting project this Tuesday just past (pictures to come soon!), which means I am now free to start this year's batch of preemie beanies! I ordered more yarn from Deramores to top up my baby yarn stash recently, and received my parcel of goodies yesterday. Now I have a lot more pastel colours to work with, which is quite exciting. 


I've used Sirdar Snuggly DK before, which I remember quite liking, so I ordered a few balls in that brand. I want to try knitting with different brands too, so that I can compare them and eventually find a favourite go-to baby yarn, so I also bought a ball of the Rico Baby So Soft DK and a few Jenny Watson Babysoft DK. On my needles at the moment is Deramores Baby DK, which is quite nice to work with.

In other news, I've finally finished my last sub-level of B1 (CEFRL) in French this term, which means I am technically at B2 level now - not that I truly believe my listening and speaking skills are solidly intermediate in standard! Whenever anyone asks me, I always say that I am only an advanced beginner, to avoid any potential awkward conversation, with my half-baked French, that might ensue. I am planning to travel to France this year though, so I really should put more effort into improving where I fall short in. My aim, therefore, for next term, is to muster up my courage - and thicken my skin - to converse more in French, without concerning myself too much with the fact that I will probably be making a kazillion grammatical errors.

Sleep calls!

Sweet yarn dreams x


Sunday, March 30, 2014

Chocolate and Guinness Cakelets

So, as you all know, last Monday, 17th March, was St Patrick's Day. How did everyone celebrate this event this year? For me, I usually end up making the chocolate and Guinness cake from Nigella Lawson's Feast; but this time round, I decided I'd make them into mini cakes - or as I like to call them, cakelets - instead, so that it's more portable and practical for giving to others.  

Guinness! $5/can at BWS
I used the same recipe quantity and divided the batter into 2 x 6-hole texas muffin pans. I had thought about baking them in regular muffin pans, but decided that the resulting product would not be able to showcase the moist, melt-in-your-mouth, crumb very well, due to the higher crust-to-interior ratio. On the other hand, the giant muffin size seemed to be the perfect one-person portion; so that was that. I checked for doneness with a cake tester at 20 minutes, then at 25, by which time it was cooked to perfection. If you had read my previous post about this recipe in one of the previous years, you would know that my last attempt resulted in the sides of the cake being a bit on the dry side from overcooking, due to my oven's uneven heating, causing the middle of the cake to take longer to cook through. This problem was not apparent at all with these miniature cakes; even the tops did not become firm at all on cooling. 


The topping I chose to make for these cakelets was a blonde mocha sauce. I poured the almost-cooled sauce directly over the cakelets while they were still in the pan, drizzled over some melted chocolate, and studded the top of each with some walnuts, which, I'm sure all will agree, is a match made in heaven for anything coffee-flavoured. If you're serving it straight away, carefully removing the paper wrapper will allow the fabulous, gooey sauce to flow down the sides of the cake, drowning it in its deliciousness. I find that pre-dressing the cakes in this way provides just the right amount of sauce for the given cake proportion.

I should mention that these cakelets also smelt amazing, even after fully cooling. I put 2 of these cakelets in an airtight container to give to a friend, on the same day they were made, and when she cracked the lid open just very slightly, someone in our company, who was having a conversation with someone else at the time, turned her head towards the chocolatey smell straight away. I am a firm believer that you really have to use the best cocoa powder you can find when making chocolate baked goods, in order to make it taste and smell truly chocolatey. My favourite at the moment remains Henry Langdon's 100% dutch-processed Pure Cocoa. It makes me happy that this is also an Australian company that I am supporting.

Obviously, the cakes will need to be kept under refrigeration, if you don't finish them all on the first day. What this will do is firm up the sauce, such that it becomes ganache-like, and look something like this:


Some others who have made this cake before have mentioned that they love eating the cake straight from the fridge the next day, and actually find it to taste better than when freshly baked. That's great; you'll get a fully-frosted chocolate cakelet, ready to have on-the-go. If your fridge is as cold as mine, however, you will not find this to be the case at all. Thankfully, a quick 10-second whizz in the microwave is sufficient to bring the cake back to life, and regain the gooey texture of the sauce, albeit still thicker than originally, unless you don't mind heating it a bit longer and having a warm cake. I personally don't enjoy warmed-through cakes though. 

Serving it up for afternoon tea the next day, after a quick whirl in the microwave


Well, I hope that gives you some baking inspiration for today! I'd love to try using Guinness in other types of baked goods, so please do share if you have any recipe ideas. :)


Happy baking! x


Saturday, March 29, 2014

Mrs Greenleaf

As promised, here are some photos of the completed project that I mentioned in my last post. If you hadn't guessed what it was, hopefully you can now tell that it's a triangular-ish shawlette :) The original name of this fab pattern by Åsa Tricosa is Semele, but I have named mine Mrs Greenleaf. The reason why would be obvious to all The Lord of the Rings fans out there ;)

Before:

I actually thought that it looked quite pleasing even before blocking.

Before blocking
I soaked it for about 15 minutes in a no-rinse fibre wash, Soak, in Unleash, which was a special edition inspired by Ravelry. I can't say that the scent of pomegranate is absolutely detectable, but the crisp green apple component is definitely there, which I love, love, LOVE. I always end up standing over the basin of Soak-ed water, inhaling in the sweet, juicy scent. I then blocked the piece using T-pins and blocking wires through the points, which I wanted to emphasise.

Wet blocking
After:

I don't enjoy the blocking process at all, because I never seem to have enough T-pins when I need them, and I am quite impatient. I find myself checking the blocked item for dryness very frequently. With this one, I actually put a sheet of cotton over the top, in an attempt to help soak up any excess water, and waved a hairdryer, on the cool air setting, over it. Several times over the course of the day. However, despite disliking this process, it is a step I would never dream of skipping, especially for lace items. Blocking works like magic on lace. I was so impressed by how it transformed my shawlette. Looking back at pictures of the unblocked form, which I had initially thought was attractive enough, it actually just looked like a fancy dishrag, compared to this beauty that lay before me.    

...et Voilà! (after blocking)

Photo-shooting time!

Blocking not only opened up the lacework, but also relaxed the fibre and improved the overall drape and feel of the fabric. 

Wing span
This shawlette version of the pattern, which was knitted in sock-weight yarn, is still large enough to wrap around the shoulders once. You could also wear it like a scarf, but I don't really like scrunching it together too much, lest I should have to block it again soon to get the creases out or to regain the proper shape. 


Alternatively, you could just drape it casually over your shoulders, which is my favourite way of wearing it. It shows off the lace best, and adds a nice, romantic touch to any outfit. Well, I think so, anyway. 


This is definitely the start of shawl-knitting obsession for me. In fact, I have already bought the yarn to knit another one of this clever designer's shawl patterns. Now all I have to do is finish winding the skeins of lace-weight yarn into balls…… (I dislike this more than blocking, which is why the first skein has been sitting in my knitting bag, part-wound to my nostepinne, for a couple of months already. Having a yarn swift doesn't help. I really need to invest in a yarn winder.)

About the Semele knitting pattern itself, it's really well- and clearly written, and teaches an ingenious cast-on method. It took me a few goes to get my head - and hands - around it, but once I got it, I realised it was actually quite straight-forward. Speaking of which, it's probably time that I revisited it, lest I should forget such a useful technique. I can definitely see myself knitting more variations of this shawlette through my knitting life.

Here's the link to the pattern on Ravelry, if you're interested in knitting this gorgeous shawlette yourself:  http://www.ravelry.com/patterns/library/semele-2


Knit on! x


Monday, March 24, 2014

Filling in the gaps!

So, I was scrolling through my list of blog posts, in an attempt to find certain knitting notes I might have made previously, and had quite the shock when I saw I had, let's just say, a lot of 'drafts', i.e. unpublished posts. From as far back as 2012. If there are any regular visitors of my humble little blog out there, please forgive me for sometimes posting the start of a project but not showing the final products. I've had so many technical issues in the past 12 months, from running out of picture upload/storage quota on my Google account (integrated with this blogging platform), as well as my Drop Box, to not yet figuring out how to transfer photos from my new, fancy-pants Sony NEX-5T compact system digital camera to my laptop.

It's probably a bit silly to publish the posts from 2 years ago, which are no longer relevant, but I thought it would be nice to 'fill in the (time) gaps' with some of the draft posts I had intended to publish last year. Since it is Autumn here in Australia (according to our calendar at least), today I shall publish my unfinished post from June 2013, as a means to encourage fellow Aussie knitters to take out their ol' click-clacks, even though just thinking about woollens being anywhere near us, in this horrible heat, is probably enough to make us perspire through our forever-summer outfits. Well, in my neck of the woods, anyway.

……………………………………………………………….
Original blog post title: Winter Kn-kni-kni-knitting. Brrr! (dated 7/6/13)

Okay, maybe I'm slightly exaggerating. I'm in Australia, so Winter here is nothing compared with the chilly, snowy Winters in the UK. Still, I do feel that our winters are becoming progressively colder each year. Thankfully, it has been warming up a bit over the last few days though.

With so many yarn fibre options these days, knitted garments can be created and worn all year round. I still find, however, that traditionally being a cold-weather activity, knitting feels most 'right' during the Autumn/Winter months. Besides, I like the warmth that the yarn provides my cold fingers as I work with it. Thus, I find myself most active in this hobby of mine during this season. I finished this year's mini batch of preemie beanies to donate to one of the local hospitals last week, and I've received an email confirmation that they've been passed on to the Neonatal Intensive Care Centre. I love that I can use my hobby to do good and benefit others in society!

[Ah, you see the pretty pink wax seal in the picture below? I think there is probably also a draft post somewhere in my list, all about my venture into the Regency letter-writing world. Stay tuned. (But don't hold your breath.)


Now that that's all done, it's time to turn the focus back to my other knitting projects. As a birthday present to myself this year, I decided to invest in the special edition Symfonie Rose interchangeable needle set by KnitPro, my favourite knitting needle brand. It contains the same set of sizes as my Symfonie Wood Interchangeable Circular Needles Deluxe set, but the birch wood laminate is fashioned to have a rosewood-like finish. Being a special edition, the gorgeous needles come housed in a matching bronze-coloured leatherette box, secured with a latch on one side.

Symfonie Rose Interchangeable Special Edition Needle Set (£70.83 from Deramores)

(Pictured are some other items I got in the same order, from Deramores. I ordered the yarn to top up my preemie hat-making yarn stash.)


New needle set + more of my favourite Clover stitch holders + Deramores Baby DK yarn (in denim blue and blossom pink) + Jesse byLouisa Harding

The needle-holding tray lifts to reveal the interchangeable cables and cable end caps, which are also brown to match the rosewood colour theme. Copper-tinted connectors facilitate a smooth connection between the needles and cables. I don't know if it's just me, but the tinted metal connectors feel somewhat less 'slippery' than the standard metal connectors. 


Also included in the box is a complimentary shawl pin, also with a rosewood-look finish, of course, and adorned with a clear Swarovski(?) crystal at the top end. 


I do still prefer the good mood-inducing bright colours of the original Symfonie wood needles, but there is no denying that this special edition rosewood set is an absolute stunner, especially in its elegant little presentation box. It makes me want to put it on display for everyone to see! And there's no such thing as having too many pairs of knitting needles, right? ;)

After finishing up on the preemies beanies, I started working on a new lace project for myself - Semele by Åsa Tricosa. I am using a fingering-weight, merino 80%/bamboo 20% blend yarn called Drift, by evoke designer yarn and fabric, which I bought once upon a time, at one of those big arts and crafts conventions. This lovely 'raspberry' coloured yarn was hand-dyed by the fibre artist, and then-owner of the Lismore-based shop, Elissa.

Can you guess what kind of item this will become? :)


………………………………………………………………...


….and that's it from that June post! I will follow up soon with a post all about the Semele, which, by the way, I actually did finish knitting last year as well. Meanwhile, in case there are knitter-readers who want to know how I found the Symfonie Rose needles, and if they're exactly like the original Symfonie wood ones, this is what I wrote in my Ravelry Semele project notes last year:

"....I have changed to the Symfonie rose interchangeables that I just received in the mail the other day, because I was having problems with the yarn catching in the needle/cable joins of my usual KnitPro Symfonie ones. However, I am experiencing the same thing with the new ones. It seems to be only the 4mm ones that I’ve had this problem with though - is this perhaps the case with all the larger-sized interchangeables?"

So now I put it back out to you guys - what do you think? Have you encountered similar problems using these needles? 


Sweet yarn dreams x